A Murphy bed, also known as a wall bed, is an ingenious way to transform your living space by creating extra room in the home. Typically mounted against the wall on hinges, the bed can be opened up and pulled down with the push of a button, when guests come over or when you need more room to move around!
There are plenty of DIY murphy bed kits and plans available online, but first, you’ll need to get all the materials together. This article will help walk you through how to build a murphy bed over couch free plans.
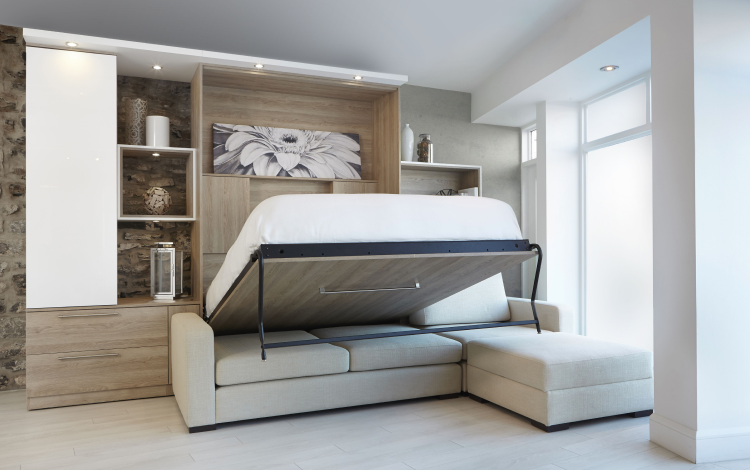
Build A Murphy Bed Over Couch Free Plans
Measure the distance between the back of your couch and the wall it is pushed up against. This will be your maximum height for installing your Murphy Bed.
Acquire 4 sheets of plywood, 1-inchx8-inch size, and have them cut into 24-inch x 66-inch pieces at your local home improvement store
Put 2 together on top of each other
Screw 2 together to create a box shape; use 3 screws on each side: two on the base layer and one in the middle (as pictured)
Cut out openings where you want doors to be; just remember that there needs to be enough room for you to walk through without knocking into or straining any other furniture
How Much Can You Save With DIY?
Murphy beds are the perfect solution for living room space problems. With this ingenious design, the bed can be lowered and out of sight when not in use, and takes up about a third of the footprint that would normally be needed for storage.
The original intent was for bedrooms with limited space, but now anyone who doesn’t have as much room as they need can benefit from installing one in their home. Building one yourself is not only budget-friendly but also provides a sense of accomplishment that’s difficult to find otherwise. Using these free plans from can provide you with a start if you’re looking to try your hand at it!
Murphy Bed With Sliding Doors Idea
Murphy beds are often the best option when space is at a premium and the house design is tight. They are less conspicuous than an air mattress, they fold up neatly into a wall in order to be completely out of sight when not in use, and you can install them almost anywhere as long as there’s room for the arm to fold in on itself.
Make Your Own From Ikea Materials
To start with, you will need two 48 x 82 boards for the side panels and two 72 x 78 boards for the front and back panels. These will form the rectangular frame of your Murphy bed. You’ll also need five or six 1x4s measuring 2 1⁄2 feet long that can be used as studs.
Why Do You Need To Build Your Own?
Building your own Murphy Bed is not only inexpensive but you can customize it the way you want and save the money that would have been spent on one. There are many resources available with instructions on how to create your own, but there are also those without explicit instructions.
Here are some pointers on how to put one together. The first thing you need is an easy-to-store bed frame which should be at least 66 inches long for twin size or larger than 66 inches for queen and king size beds.
Simple Murphy Bed Plan
The Murphy Bed Plan provides you with all the resources you need to make your own customized wall bed, starting with tools and materials. All you have to do is print out the PDF at the end of this post, trace it onto your plywood board, cut it out using power tools and follow the instructions! If you’re looking for more complex instructions on how to build a Murphy Bed from scratch, check out: (link)
Cabinet Style Murphy Bed Plan
Murphy beds have been around for years and with good reason. Murphy beds save space, look classy, are easy to open and close, and have foldaway storage beneath them so you don’t waste any room. They’re especially useful in small homes or apartments where space is limited.
Making your own murphy bed can be relatively simple if you use the right tools and materials. Here are step-by-step instructions for building a DIY murphy bed for under $100:
First find out how much clearance space you’ll need below the door sill of your closet, between the door opening and the top of the hinge side of the door – this should be at least two feet high.