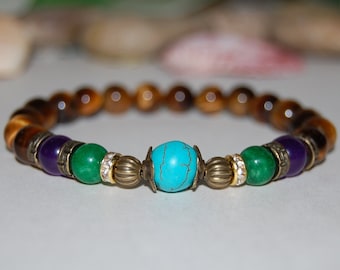
Choosing an elastic bracelet is an easy way to add some personal touch to your outfit. Not only can you create a custom bracelet, but these bracelets are incredibly comfortable. You can make your own elastic bracelet by simply stringing beads onto a stretch cord. Here are a few tips for making your own elastic bracelet. Besides being super comfy, they are also very easy to make. Hopefully, you’ll be able to find a design that’s perfect for your style!
Beading with elastic cord
Elastomeric cord is a great beading material for beginner beaders, crafts with children, and lightweight, easy-to-wear bracelets. It is also an economical option because the supplies you need are simple: beads, glue, scissors, and cutters. To get started, read this tutorial and follow along! You can create beautiful, original pieces in no time! But before you start, make sure to measure the length of your elastic cord and beads.
One of the biggest concerns when creating beaded designs with elastic cord is its durability. A lot depends on the weight of the design you create. The heavier the beads, the higher the risk of premature breakage. If you don’t want your creation to fall apart, choose a cord with a thicker core, as thick cords can handle more weight. The cord should be strong enough to support the weight of the beads and not stretch out or tear too easily.
If you’re using stretch beads, hold them by their edges with your index finger and thumb. Stretch them out by moving your hands away from each other, so that the elastic is activated. This will help your design look seamless. When you’re finished, pull the elastic cord tight, avoiding pulling it apart. It can be very tricky to do without proper tools. Hopefully, these tips will guide you to creating a beautiful, custom-made bracelet.
Stringing beads with elastic cord
When it comes to beading, one of the easiest ways to string beads is with elastic cord. It’s a cheap, easy way to create funky jewelry without a needle and requires only a few supplies. Most stores allow you to try out the cord on a few beads before you buy it. You can even double the cord over and string beads without a needle! Here are some tips for choosing an elastic cord for beading.
Start by determining what size cord to use. You’ll need 0.8mm, 1.0mm, or 1.5mm elastic stretchy cord for this project. Choose a size that fits your beads without putting too much stress on the elastic cord. Remember that not all beads are the same size and that different factories have different hole sizes. Standard drill beads have holes that are about ten to fifteen percent of the bead’s size.
When stringing beads with elastic cord, it’s important to stretch the cord gently before you begin. Be sure to stretch the elastic a little before you start to work. You don’t want your finished product to have gaps in it! Use binder clips or folding tape to keep your beads in place if they tend to slide off the elastic cord. Also, don’t forget to glue knots with beading glue.
Making a stretch bracelet
When making an elastic bracelet, there are a couple of tips to remember. The first is to make sure the elastic is tightly coiled. Doing so will keep the bracelet from slipping and will make the knots more secure. You can also add beads with large holes to hide knots. Afterwards, string the beads one by one on the elastic cord. The stretch bracelet should look seamless. Once you’ve finished, add a bead at the end of the elastic cord.
Using a variety of beads will make the bracelet look more appealing. You can choose colored plastic beads, which are relatively inexpensive and come with larger holes, or glass beads. Using different colored glass beads is ideal, as they come in many different sizes. You can also use seed beads for this project, but be sure that they have a larger hole. Stretch bracelets are made by stringing beads onto an elastic cord, which stretches like a rubber band.
Another tip for making a stretch bracelet is to use strong elastic cord. You can choose any type of beads you wish, as long as they will be durable. Choose a thicker cord if you’re using big beads, as this will help keep your bracelet from tangling or ripping. If you’re using smaller beads, use a softer elastic cord. A stretch multi-strand bracelet with more than four rows is a great choice for a stylish cuff. You can also choose wooden beads or semi-precious beads, as long as you use the right technique and materials.
Tieing an elastic cord bracelet
Choosing the correct size when tying an elastic cord bracelet is essential for the overall design. Since most stretchy cords are not woven tightly, the length can elongate over time. To keep your bracelet from sagging, pre-stretching it is a good idea. This way, the thread will retain its elasticity and not elongate. When making the bracelet, try to choose beads that are slightly smaller than the cord’s diameter.
Once you have selected a size, make the knot using the crimping pliers. Make sure to form a cylinder-shaped fold that is secure. Once you have made your knot, roll the bracelet onto your wrist. Repeat this process until you are satisfied with its size. Do not forget to store your bracelet away from sunlight, oils, and chemicals. Make sure that it does not get tangled with the other parts of your jewelry, or it may break.
When tying an elastic cord bracelet, you should cut the ends to 1.5 inches. You should also leave an inch on either end of the bracelet for knotting. Then, pull the elastic cord taut and tie a basic overhand knot. If you are making a long bracelet, you should double the knot and glue it to the clasp. Once the knot is sealed, you can wear the bracelet! It will dry in 15 minutes and cure for 24 hours.
Using two cords to make a more durable bracelet
Using two cords to make an elastic bracelet white increases the strength of the piece and makes it much more durable. It is also easier to tack the bracelet to a wrist. When using two cords, you’ll need to make sure that the pieces are firmly connected and the elastic thread fits in the bead channels. Using two cords will also make your bracelet feel more substantial. Single elastic cords are soft and gossy, and can’t withstand the rocking and bending that can occur when wearing jewelry. A two-stranded design can be completed with a unique knot.
If you’re making a stranded elastic bracelet with letter beads, you can cut off one end and keep the other one long. The length of the bracelet will be shorter than the two cords combined. This extra length will make it easier to string beads. Start by stringing the letter beads first, followed by seed beads. Continue to add beads to make the bracelet more durable and attractive.
The first step in making a more durable elastic bracelet is to decide what kind of beads you want to use. Clear cords are better for clear beads, while dark colored ones are less effective with clear cords. When choosing the size of beads, you can visit a local bead store and check its size. Most stores will let you test the elastic on beads, so you can be sure that it fits properly.
Wearing an elastic bracelet
While wearing an elastic bracelet, you should be careful to wear the bracelet properly. You should never stretch it to the point where it creates a triangle. Also, avoid pushing one end of the bracelet between your fingers. This may cause it to rupture. Also, make sure to wear the elastic bracelet with a wristband, not on it. This can help prevent your bracelet from falling off. Make sure the bracelet fits your wrist perfectly before wearing it.
The elastic material used to create bracelets and anklets is made of collagen, which is a protein that is found in your body. It can easily break if it is stretched or pulled, and it can lead to sagging. This problem is often exacerbated in those who wear bracelets almost constantly. For this reason, it is important to prevent the elastic from becoming too tight and causing your wrist to catch. A simple knot can prevent this problem.
If you are having difficulty wearing the bracelet, you can use needle nose pliers to tighten the knot. It should not move even when you tug on the wire, and it should be tight enough. In addition, you can tuck the tail of the bracelet into the beads. The crimp bead should be large enough to keep your wrist secure. This is the easiest way to adjust the bracelet’s length. Moreover, if you are having trouble wearing the bracelet, you can always use a crimping tool to fix it.
Read More: Explore Incredible Range of Gemstone Jewelry at Heritage Auction- Heirloom Sale


